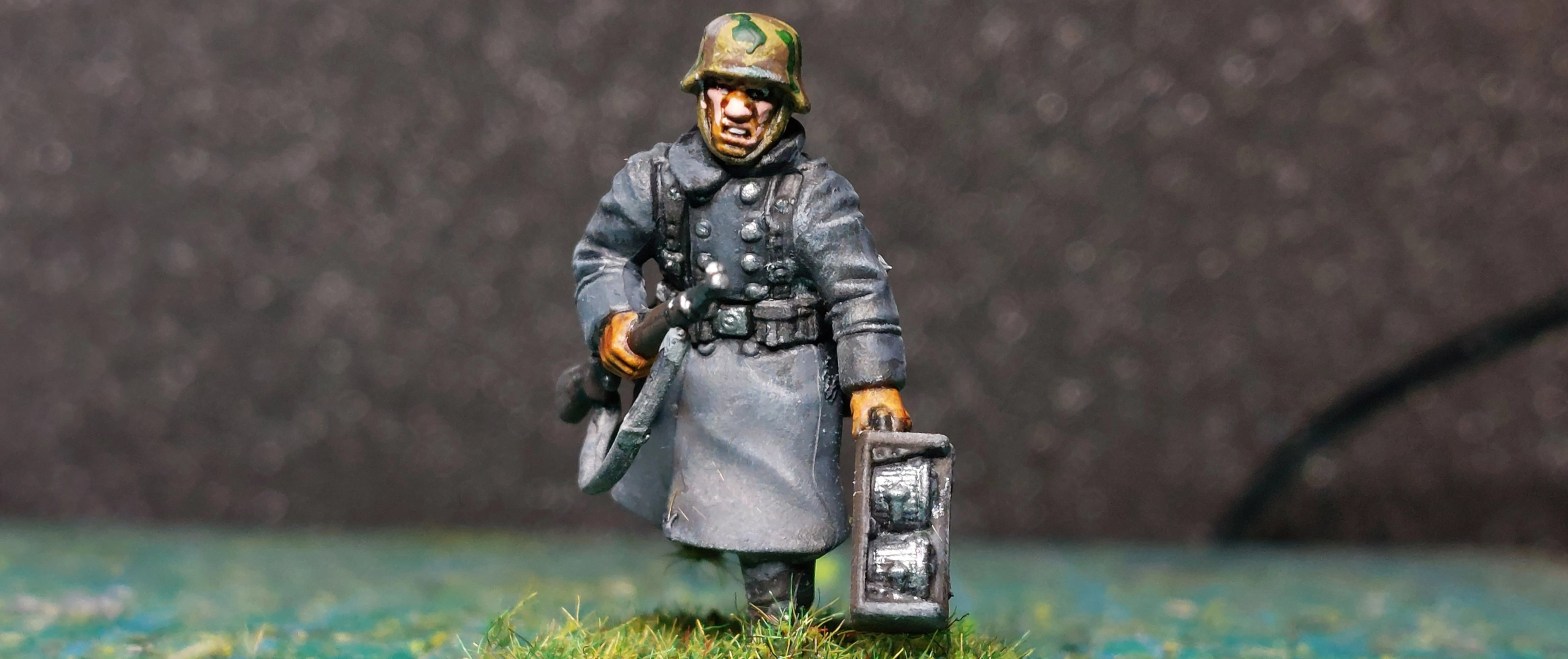
So this week I have my first game using my Pro-Nazi French against an Operation Sealion British force. I used the Operation Barbarossa force list to build my force, most the infantry are from the Winter Germans Bolt Action box set, the Heavy weapons are 3D Breed prints and the vehicles are various 3d prints.
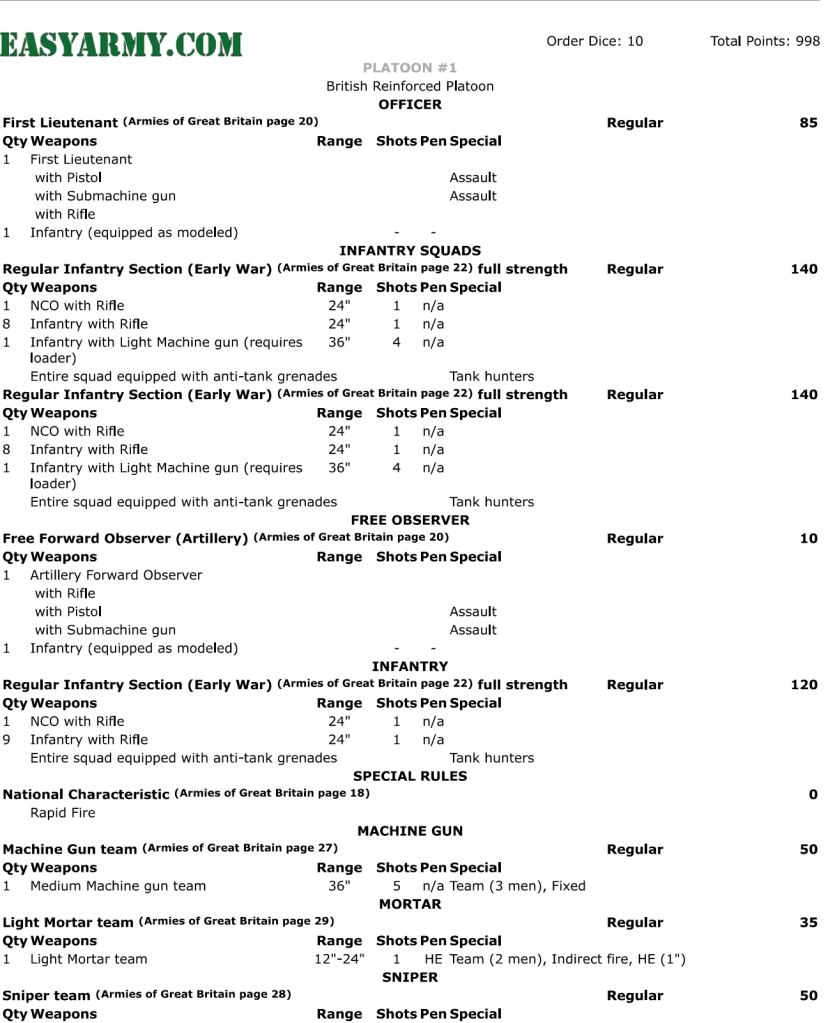
Below is a PDF of my list – which was 4 Regular Squads, a 2nd Lieutenant, A/T Rifle Team, Light Mortar Team, SDKFZ 222, Panzer 3 Ausf E, Medium Machine Gun, SDKFZ 251/10 and a Pak 37 Light Anti Tank gun.
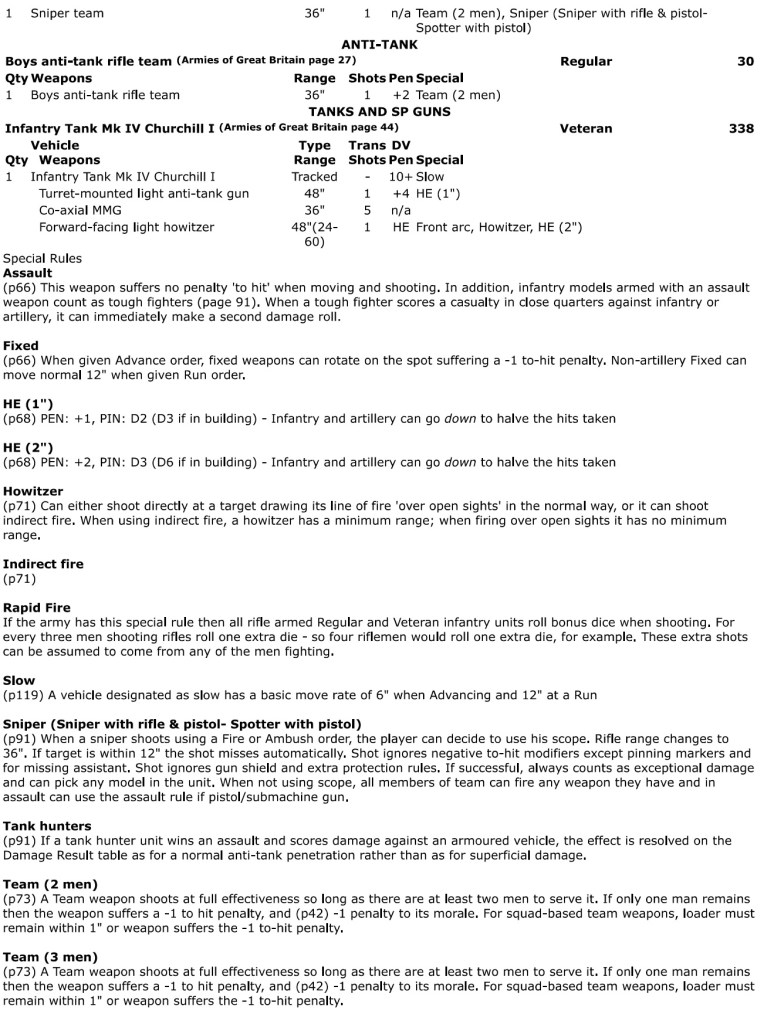
My opponents forces were – 1 ATS Regular rifle section, 2 regular rifle sections, regular mortar, MMG, buoys A/T rifle and snipers, free forward arty spotter, 1st LT and Vet Churchill MK 1. This was one of his first Bolt Action games and potentially his first at 1000 pts.
We played the game at October Wargames Association which meets on a Tuesday evening at the Moseley All Services Club.
The mission was – Meeting Engagement. The forces meet at a road junction near a bridge leading to a village.
The Franco/German right consisted of 3 infantry squads, the Sdkfz 222, Sdkfz 251/10 and officer, opposite them were the British A/T Rifle, Sniper team and 1 Rifle Squad.
–EDIT– my opponent has shared his list with me so here it is.
The image below is of this side of the table as at Turn2
On the left the Franco/German’s deployed their Light Mortar, medium machine gun, A/T Rifle, Pak 37, Air Force forward Observer and the remaining rifle squad, these faced the Cromwell Mk1, Light Mortar, Medium Machine Gun, officer, a Squad of ATS, the British Artillery Forward Observer and the last rifle squad.
Again this photo is from Turn 2
and lastly the whole Table as at Turn 2 –
The Franco/Germans put their PAK 37 and MMG on ambush early on during turn 2 whilst their Light mortar tried to bring fire down on the advancing ATS. The German A/T Rifle had deployed on the far left behind a tree, and the Air FO supported by an infantry squad was advancing through a walled field to get eyes on the Churchill.
The British Artillery FO occupied the house on the British Right (Franco/German Left) and having deployed in Round 1, called in the artillery barrage during Round 2 to support an advance by the Churchill, ATS and Officer. The Churchill advance triggered the PAK 37 Ambush, which missed and the ATS came under fire from the MMG which managed to remove their brave officer.
Meanwhile the British Light mortar advanced down behind the house with an aim to target the A/T Rifle team, Panzer 3 or PAK 37. The Franco/German right pushed forward towards the village with the Sdkfz 222 opening fire on the A/T Rifle team, admittedly missing, and 1 of the rifle squads reaching the ruined house by the bridge before coming under fire from the British Sniper team, Rifle Squad and MMG.
Close up of the German Light mortar, MMG and Air FO.
At the beginning of turn 3 the Artillery barrage landed putting pins on the Franco/German A/t Rifle, Pak 37 and Panzer, all of whom then failed their Morale check to activate and went down. The Franco/German air FO callied in a strike on the British officer on the road, only to see the officer advance further forward to the protection of a stone wall. The ATS opened fire on the Rifle squad taking full advantage of Rapid Fire but alas not even putting a pin on the squad, which returned fire achieving a single pin. The Light mortar continued to try and get aim failing for the second round, mean while the MMG continued to inflict hits on the ATS, only to come under fire from the second rifle squad, as they advanced into a plough hedge bound field, and MMG.
Mean while over on the Franco/German right, the rifle squad in the ruin came under further fire losing a total of 3, returning fire to limited effect. The Sdfkz 222 manoeuvred to draw a line on the rifle squad by the ruined church, and the officer urged the Sdkfz 251/10 and one of the rifle squads forward, whilst the last squad moved slowly through a wall surrounded wheat field.
Turn 4 began with the German Air strike – which turned out to be a diver bomber and on target, alas because the officer had moved there was no enemy in the target zone, but the arrival of the plane did manage to put pins on the Churchill, ATS and rifle squad. This caused the Churchill to fail it morale check to undertake orders and reverse back behind the building out of sight from the Panzer 3, which retaliated by opening up with its 3 MMG’s on the officer and his mate removing them from the field.
The ATS continued to trade fire with the rifle squad advancing in the field. This turn saw the Panzer push forward to draw a line on the Churchill and ensure that its thickest armour was presented to it. The A/T rifle not having the penetration power to damage the Churchill took shots at the British officer, and the PAK 37 tried again to damage the Churchill. The British MMG, sniper and rifle squad continued to lay fire on the unit in the ruined house, further pinning it. Mean while on the far right the Sdkfz 251/10 fired at the British A/T rifle killing one of the team, as the officer took refuge in it, only to then be blown up by the A/T rifle team and the first 2
Turn 5 saw while the Sdkfz 222 advanced on the bridge and opened fire on the MMG team taking 2 of them out of action. The none LMG German squad charged and wiped out the A/T Rifle, the further depleted squad in the ruin kept its head down and continued to draw fire from the sniper and British rifles. The 3rd squad advanced and opened fire on the sniper team, killing both. The ATS and rifle squad in the field on the British right went down, and the ATS took fire from the Panzer 3, Squad in the Field and MMG. So from being 2 kills to 1 up, the British ended this turn 3 kills to 2 down.
Round 6 saw the Franco/German right push forward further pinning the British Rifle squad, the German MMG took out the last team member of the British MMG, the German light mortar actually hit its target and killed 1 of the ATS who then had 7 pins and were down to 1 team member who decided to call it a day.
The battle ended 5 kills to 2 in favour of the Franco/Germans, but realistically up until turn 5 it could have gone either way.
Battle field end of turn 6-
Close up of German Right Turn 6
Close up of Franco/German left flank
The British Right flank
Hope you enjoyed this report, this battle has been submitted to Operation Critical Hit.
Discover more from Hysnaps Politics, Gaming, Music and Mental Health
Subscribe to get the latest posts sent to your email.

